Engineering Drawing Basics
Engineering drawings are an effective way to plan designs and communicate ideas. They are the most fundamental tools utilized in the engineering design process because they help us visualize, communicate, and document each step of our progress through the design and manufacturing cycle. These drawings are used in every phase of the engineering design process, starting from concept brainstorming and utilized up through manufacturing of the solution.
Engineering drawings are a type of visual communication that includes images, text, and numeric information. These drawings follow clear and precise standards with definite rules that must be mastered and utilized for a successful engineering design process to be implemented. These drawings are a graphical representation of a part or assembly and can be produced freehand, using mechanical drawing tools, or with computer methods such as Computer-Aided Design (CAD).
Final working drawings are a set of technical drawings used during the manufacturing phase of the engineering design process. These contain all of the information needed to manufacture and assemble the product. Some things that need to be included in the final working drawings include dimensions, quality and inspection requirements, various views of the product, symbols and line types referring to boundaries and other physical aspects of the product, and a Title Block. The Title Block will include such information as the designer’s name, part number and brief description, material, finish, weight, tolerances, scale, and units.
Codes and Standards
Codes and standards clarify and organize the work of engineers. They also create unity by providing a communication system that is used universally amongst engineers and other entities that work with engineers. Codes are sets of specifications for the analysis, design, manufacture, and construction of something. Standards are specifications for parts, materials, or processes that help achieve uniformity, efficiency, and quality. Some examples of organizations that establish standards and design codes are ISO, AISI, SAE, ASTM, ASME, ANSI, etc. For our purposes, the ISO standards for technical drawings will be used and can be found in two handbooks:
- ISO Standards Handbook: Technical drawings, Volume 1: Technical Drawings in General
- ISO Standards Handbook: Technical drawings, Volume 1: Mechanical Engineering Drawings; Construction Drawings, Drawing Equipment.
Below is a brief synopsis of the knowledge, skills, and techniques from these handbooks that are needed for our work in RGL.
Hand Sketching
In the realm of engineering design, where precision and accuracy are paramount, the art of hand sketching may seem like an antiquated practice. However, hand sketches remain an indispensable tool for engineers, playing a crucial role in the conceptualization, communication, and refinement of ideas throughout the design process. This section explores the significance of hand sketches, outlining their benefits, techniques, and practical applications.
There are four key roles that illustrate the importance of hand sketching in the engineering design process:
- Visualization and Conceptualization – hand sketches serve as a means to visualize and conceptualize ideas in their rawest form. They provide engineers with a platform to quickly explore multiple design alternatives, allowing for rapid iteration and refinement of concepts. Hand sketches are often used during the early stages of the design process to explore initial concepts.
- Communication – hand sketches facilitate effective communication among team members, clients, and stakeholders. Unlike complex CAD models, hand sketches convey ideas in a clear and cosine manner, fostering better understanding and collaboration.
- Creativity and Innovation – hand sketches encourage creativity and invocation by enabling engineers to freely explore ideas without the constraint of digital tools. The spontaneity of sketching often leads to novel solutions and breakthroughs in design. Hand sketches are perfect for brainstorming and ideation.
- Problem-Solving – hand sketches are invaluable for problem-solving, allowing engineers to visually analyze and dissect complex systems or components. By sketching out different scenarios, engineers can identify potential challenges and devise solutions more effectively. Engineers often do this while observing the prototype, part, or assembly working in real-time so that improvements can be made in future design iterations.
While hand sketching is a bit of an artistic endeavor, you don’t have to be a great artist to produce useful hand sketches. There are some simple techniques to aid in the efficient and effective creation of hand sketches. Try focusing on the following ideas when producing hand sketches during the engineering design process.
- Use Basic Shapes – start with simple geometric chapes such as circles, squares, and triangles to outline the overall form of the design. These basic shapes serve as building blocks for more complex sketches.
- Proportion and Scale – pay close attention to the proportion and scale to ensure accuracy and realism in the sketch. Use light, loose lines initially to establish the overall proportions before adding finer details.
- Line Weight and Style – Vary the weight and style of lines to distinguish between different elements of the design. Bold lines can emphasize key features, while lighter lines can indicate secondary details or dimensions.
- Shading and Texture – incorporate shading and texture to enhance the realism of the sketch and convey depth and dimensionality. Use hatching, cross-hatching, or stippling techniques to simulate shadows and surface textures.
- Annotations and Labeling – provide clear annotations and labeling to identify components, dimensions, and other relevant information. Use concise text and arrows to convey important details without cluttering the sketch.

Figure 1, above, is a great example of a hand sketch that could represent a system being developed for RGL. Here, you can see that consideration is given to adding protection for the robot’s kill switch, addition of a hammer weapon utilizing a pneumatic actuator, and the inclusion of a ramp for controlling movement of other robots. Some detail is included for various parts of the design as well.
Hand sketches like the one above remain an indispensable tool in the arsenal of engineers, offering numerous benefits throughout the design process. From conceptualization and communication to problem-solving and prototyping, hand sketches play a vital role in shaping innovative and successful solutions. By mastering the art of hand sketching, engineers unlock new dimensions of creativity, collaboration, and efficiency in their design endeavors.
The link below provides a great example of how to try your first attempts at engineering hand sketches. Watch the video and try to replicate the drawings on your own. After you watch and try this example, find a picture of a robot from BattleBots and try to sketch it yourself!
https://www.youtube.com/watch?v=ceK1tEGZals&ab_channel=DavidDiIenno
Drawing Sheet Layout
Drawing sheets are the pieces of paper that engineers draw and communicate the design of a part or assembly upon. Parts are individual objects that have been designed while assemblies are groups of parts with instructions for putting them together. Layouts of drawing sheets vary by standards set within specific organizations. However, an engineering drawing sheet has a typical layout with several elements that are universally expected. Figure 2, below, illustrates the layout of a typical sheet, showing the title block, scale, etc.
Sometimes, a drawing is divided into a grid using letters and numbers, much like a chess board. This is called “zoning” and is typically done for large-size drawing sheets and allows for easy reference to various parts of the drawing. This is also illustrated in Figure 2, below.

Often, drawing sheets have a “drawing frame” that is printed on the sheet to define a margin around the outside of the drawing window. In Figure 2, the drawing frame contains the zoning letters and numbers. This way, the margins of the drawing frames are standardized for each size of paper. Paper sizes are also standardized as shown below in Figure 3.

Title Block
The title block of the drawing sheet is normally found across the bottom of the drawing window or at the bottom right corner of the drawing frame and it should contain the following elements:
- The title of the drawing
- The name of the company or organization
- The signature or initials of the draftsman
- The drawing number – typically a unique filing identifier
- The scale factor
- The units of measurement
- The angle of projection used
- Material parts numbers
- The revision number
- The sheet number if the project has multiple sheets of drawings
- Tolerances, surface finishes, etc.
If the drawing has multiple revisions, it is customary to include a revision table at the upper right of the drawing frame. All modifications/revisions of the drawing are documented there. The materials parts list, or Bill of Materials, is also often contained in the drawing and should list the part names, part numbers, number of parts, drawings of each part, etc. This is typically at the bottom right of the drawing frame, near the Title Block (see Figure 4, below). If the Bill of Materials is large, separate sheets may be used for the parts list.

Notes are often added to a drawing and contain information other than pictorial views and dimensions necessary for completing the drawing itself. These are also placed near the Title Block of the drawing sheet and are numbered consecutively downward. Some things to include in notes are:
- Dimension Notes – “All dimensions apply after surface treatment”
- Heat Treatment Notes – “Heat treat in accordance with standard ‘x’ to a
hardness of ‘y’” - Joining Methods – “Use a fusion weld”
- Plating and Coating Notes – “plate with silver”
- Surface Preparation Notes – “surfaced to be cleaned and polished”
- Testing and Inspection Notes – “Radiographic inspection of all welds”
- Miscellaneous Notes – other things of importance
Lettering
Lettering is defined as writing of any sort in titles, sub-titles, dimensions, etc. There are standards for how lettering should be handled on all engineering drawings. This is to ensure that the text is clear and easy to read. The primary features to consider while lettering a drawing are legibility, uniformity, and speed of execution. To make lettering a speedier process, it should be done freehand. It will take practice to make the appearance of your lettering neat and uniform. Refer to Figure 5, below, for an example of good lettering style. The following things should be considered when lettering your drawings:
- The thickness of the parts of each letter should be uniform (the same thickness) as if done with one single stroke of the pencil.
- All lettering is done in upper-case unless the letters represent units.
- Size of letters is measured by the height of the capital letters and numbers.
- Standard heights for CAPITAL letters and numbers are 1.8, 2.5, 3.5, 5, 6, 10, 14,
and 20 mm. - Guidelines are used to obtain correct and uniform height. They are drawn, using a 2H pencil, with light pressure so that they are just barely visible on the page.
- It is recommended that main titles be larger than sub-titles, which in turn are usually larger than dimensions, notes, etc.

Engineering Drawing Line Styles
Engineers use different line styles and widths in their drawings to indicate specific details of the parts. This makes the drawings easier to read and the parts easier to translate to manufacturing. Below are some of the most common line types you will see on engineering drawings, along with brief descriptions.

- Part Outlines – Shows the visible outline or edges of the part or assembly.
- Section Lines – Represent the cut surface. These often come in pairs or in hatchings that look like saw marks.
- Hidden Lines – Sometimes there are features to the part or assembly that are inside the main body of the part. For example, there could be a hole bored through a shaft. This can be represented by drawing dashed lines outlining the hole. Dashed lines like this are called hidden lines and represent the interior features of the part.
- Center Lines – Denote the center of a circle or centering of a cylindrical feature. This can be seen by the center line labeled “A” in Figure 4, above.
- Dimension and Extension Lines – Used to indicate the size or position of a feature.
- Cutting Plane Lines – Drawn to illustrate that the view of the drawing feature is shown as if the part was cut in two. See “Section AA” in Figure 4 for an example.
- Break Lines – Show that the drawing of the part has been shortened. Broken views are used for parts having much larger dimensions in one direction than in other directions. In this case, the longest dimension has no extra detail along that feature that needs to be in the drawing and is therefore partially removed and denoted by zig-zag lines called break lines. This is commonly seen in drawings of objects like shafts. See figure 7, below.

Dimensioning
It is crucial that engineering drawings properly define the size, form, and location of the features and components of the part. Before a design can be manufactured, all information about the size and shape of the object must be defined. The exact shape of the part or assembly is shown by the drawing views of found on the drawing sheet. Dimensions are not usually put on the 3-dimensional drawing of a part but are always included on the two-dimensional drawings. These dimensions show the size and location of all details of the part. Without this, the part would not likely be manufactured correctly.
- In metric or SI drawings, use units of millimeters. To avoid putting an “mm” beside all of the measurements, add text such as “all dimensions in mm” in the title block.
- If the dimension is smaller than one, a leading zero should be used before the decimal point (e.g., 0.25).
- Dimensions can be used to show both size and location of a feature on a part or assembly.
- The lines that extend out from the part drawing to the arrows leading from the dimension numbers are called dimension lines, an example is the 17.25 dimension in Figure 7.
Types of Dimensions
- Linear Dimensions are either positioned horizontally or vertically to the dimensioning plane, as seen in the dimensions included in Figure 7 above.
- Angular Dimensions are usually specified in degrees (e.g., 23.5°). They can also be listed as degrees, minutes, and seconds of arc (e.g., 23°15’45”). See Figure 8, below, for examples of angular dimensions.
- Leader Dimensions usually specify a diameter or a radius where a leader line is used to point toward the feature being dimensioned. Examples in Figure 8.

Rules of Dimensioning
- Never crowd your dimensions or make them difficult to read.
- Each feature must be dimensioned.
- Dimensions should be placed outside of the part when possible.
- Dimensions should be evenly spaced.
- Don’t give the same dimension in more than one way, it is confusing and clutters your drawing.
- Dimensions should be placed in the views where the part is being shown in its true shape.
- Dimensioning to hidden lines should be avoided when possible.
- Dimension lines should not cross.
- Dimension and extension lines should not cross.
- Leader lines should slope at 30°, 45°, or 60° with the horizontal.
- Center lines should be used on all arcs, circles, and cylinders.
- Generally, you should dimension a circle using its diameter when possible.
- Arcs should be dimensioned by their radius.
- Cylinders should be located using center lines.
3-Dimensional Views
Working drawings, those used to manufacture the part or assembly, usually include a three-dimensional view (or multiple views) of the part or assembly. To do this, a drawing is made such that the object appears to be rotated to show itself in all three dimensions, which is called an Axonometric View. These views are classified according to how the axes are oriented, either as Isometric, Diametric, or Trimetric.
Isometric views have the two edges of the view making 30-degree angles with the horizontal and that makes the three angles between the view axes equal to 120 degrees. See Figure 9, below.

Diametric views have angles that vary, but two of the three angles between the view axes are equal. See Figure 10, below.

Trimetric views have all three angles between view axes at different angles. See
Figure 11, below.

Oblique views have their front face drawn to the exact shape and size of the object, to scale, while the other two faces are projected from this front face at any angle and in any direction. The use of a 45-degree angle is fairly common for the other faces. An oblique view is not a realistic kind of view, but it is convenient and easy to use for freehand sketching, which is usually the first type of drawing done during the engineering design process. See Figure 12.

Orthographic Projections (2-D Views)
Orthographic (or orthogonal) projection is a way to represent 3-dimensional objects in two dimensions. This is done by conceptualizing the 3-dimensional object floating in space (in a quadrant system) and drawing 2-dimensional representations of the object as it would cast an image of itself on various projection planes. The planes are opaque and each view is pushed through the object onto the plane adjacent to it, see Figure 13 below.
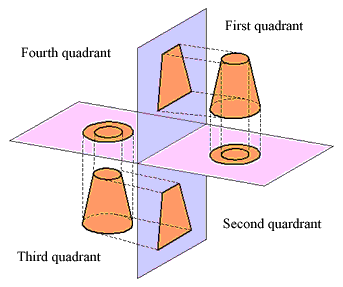 Figure 13
Typically, orthographic projections are completed as a set of multi-view illustrations with up to six pictures of the object. In most cases, only two or three drawings are needed (usually three), with each projection being perpendicular to one of the coordinate axes of the object.
The views are positioned with respect to each other according to either the first-angle or the third-angle scheme. A first-angle projection has the object conceptually located in the first quadrant. In first-angle projection, the views (starting at the left of your drawing frame and going clockwise) follow this sequence: the right view of the object, then the bottom view (situated above the front view), then the left view (situated to the right of the front view), then the top view (situated below the front view). This style of projection is commonly used in parts of Europe and India. See Figure 14, below:
| Bottom View | |||
| Right View | Front View | Left View | Rear View |
| Top View |
Figure 14
A third-angle projection has the 3-dimensional object located in the third quadrant. In third-angle projection, the views (starting at the left of your drawing frame and going clockwise) follow this sequence: the left view of the object, then the top view (situated above the front view), then the right view (situated to the right of the front view), and then the bottom view (situated below the front view). This style of projection is commonly used in parts of the USA and Canada. See Figure 15, below:
| Top View | |||
| Left Side | Front View | Right Side | Rear View |
| Bottom View |
Figure 15
To know which system is being used, most drawings have a standard projection symbol to indicate the projection system utilized. Look for the symbol found in Figure 16 to make that determination when viewing engineering drawings.
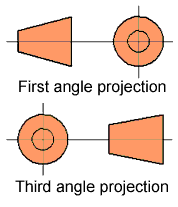 Figure 16
Scaling
When we make an engineering drawing, we usually do not make the drawing the same size as the parts or assemblies we are representing. We have to either make the drawings smaller or bigger than the actual parts. However, we want the drawings to look proportionately correct when compared to the real object. We also want our dimensions to be comparable by the same ratio on all parts of the drawing. Therefore, we must “scale” our drawings. This means we simply assign a multiplication factor to our drawing in such a way that one unit of space on the drawing represents some number of units of the actual object. For example, one centimeter on the drawing might represent one full meter of the object. One situation where scaling is appropriate is for detail views.
Detail Views
Sometimes there are small features of an object or small parts of an assembly that have great amounts of detail. To represent these small details, a separate scaled-up view of the small section is created as an additional drawing. Detailed view drawings are typically designated by the name of the part or a letter (i.e. “Part A”) and the scale is typically indicated. For example, in Figure 17, found below, the motor controllers, pressure regulator, and pneumatic valve have detail views drawn.
Assembly Drawings
Assembly drawings show how multiple parts, or subassemblies, come together in a final unified assembly. An assembly drawing illustrates the fit and function of each part or subassembly and verifies that everything will fit together as desired. These drawings must provide enough information to enable the assembly of the components.
The fundamental features of assembly drawings are:
- Enough views to show how the parts fit together.
- Must have enough section views to show how parts fit and to eliminate hidden details.
- Dimensions to indicate the range of motion and overall size of the assembly.
- Leader lines and ballons to number/identify individual components.
- A parts list (Bill of Materials) that is related to the balloon numbering on the drawing.
- Multiple 3-D views to aid in visualizing the fitting together of components.
See Figure 17, below, for an example of an assembly drawing.
